How We Score Clutter Systems
ClutterScience uses a five-factor composite methodology for every recommendation and protocol. Composite weights: Research 30%, Evidence Quality 25%, Value 20%, User Signals 15%, Transparency 10%.
| Factor | Weight | What It Measures |
|---|---|---|
| Research | 30% | Fit with habit formation, retrieval friction, environmental cues, and household workflow evidence |
| Evidence Quality | 25% | Consistency with consumer-safety guidance, professional organizing practice, and product documentation |
| Value | 20% | Payoff relative to cost, setup time, durability, and space recovered |
| User Signals | 15% | Common household failure points, return complaints, repeated mess patterns, and ease of maintenance |
| Transparency | 10% | Clear tradeoffs, limitations, measurement assumptions, and when a cheaper option is enough |
The score is not a promise that buying one product will fix clutter. It is a way to compare whether the system reduces decisions, keeps high-use items visible, and makes the next reset easier.
Why Deep Pantries Fail
A deep pantry looks generous until food starts disappearing behind other food. The back of the shelf becomes a second pantry with no memory. Duplicate pasta, old cereal, half-used baking supplies, and forgotten cans collect because the shelf hides inventory from the person making the grocery list. The solution is not simply more bins. The solution is a pull-forward system that makes the back of the shelf behave like the front.
Deep pantry organization should protect three things: visibility, rotation, and retrieval. Visibility means a person can identify the category without unloading the shelf. Rotation means older food is used before newer food. Retrieval means one item can be removed without collapsing a stack. If a setup fails any of those three tests, it will drift back into clutter.
Useful searches include deep pantry pull out bins, pantry shelf risers, clear pantry bins with handles, and pantry date labels.
The Deep Pantry Map
Make a shelf map before buying anything. Assign the easiest shelf to daily cooking staples, breakfast, snacks, or school-lunch supplies. Assign higher shelves to backup goods and occasional baking. Assign lower shelves to heavy items such as cans, flour, rice, and beverages. Do not put fragile jars or heavy appliances above shoulder height.
Each shelf needs a front zone and a back zone. The front zone is active. The back zone is reserve or duplicate. If both zones contain random categories, the shelf will fail. A deep shelf works when the back is pulled forward with bins, trays, or a written inventory.
Step 1: Empty and Edit
Remove one shelf at a time if the pantry is large. Check dates, damaged packaging, stale snacks, and mystery containers. Food safety guidance from USDA and FoodSafety.gov makes date awareness important, but the organizing point is simpler: food that cannot be identified or trusted will not be eaten.
Group items by meal pattern, not by packaging shape. Breakfast, baking, dinner bases, snacks, canned proteins, grains, and lunch packing are easier to maintain than vague categories like boxes or bags. If a category is too large for one bin, split it by use frequency.
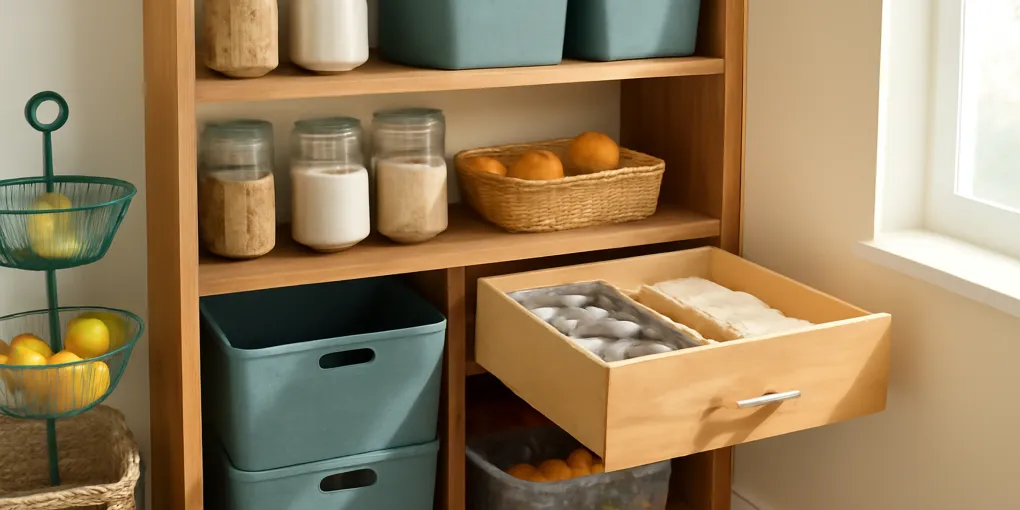
Step 2: Choose Pull-Forward Containers
Deep shelves need containers with handles or trays that slide forward. Clear bins are useful because they show inventory, but labels still matter when multiple people use the pantry. For heavy cans, use shorter bins or tiered risers. For lightweight snacks, use deeper bins only if they can be pulled out fully.
Avoid huge bins for mixed snacks. They hide older items and encourage dumping. Use smaller bins for lunch snacks, breakfast bars, salty snacks, and sweets if those are meaningful categories in your home.
Step 3: Create a Use-First Zone
A use-first zone is a small front basket for open packages, near-date food, and meal components that should be used this week. It prevents the common problem of opening a new item while an older one sits in the back. Put the basket at eye level or waist level, not on the floor.
During grocery unloading, move older duplicates to the front and place new duplicates behind them. If that takes more than a minute, the shelf is too full or the bins are too deep.
Step 4: Label for Action
Labels should tell people what to do. Use labels like Use First, Breakfast Refills, Dinner Bases, Baking Open, Baking Backup, School Snacks, and Canned Beans. A label like Miscellaneous is a warning sign. It means the category has not been decided.
For decanted items, include the food name and date or keep the original package information nearby. Do not decant foods your household rarely uses; it creates extra work and can remove useful instructions.
Step 5: Maintain the System
The maintenance trigger should be grocery day. Before shopping, check the use-first basket and the active bins. After shopping, load new items behind older ones. Once a month, pull each bin out fully and wipe the shelf.
If a bin is always overflowing, decide whether the category is under-sized or over-bought. Buying a bigger bin is not always the answer. Sometimes the category needs a tighter shopping rule.
Measurement Checklist
Measure the physical space in three ways: total opening, usable interior, and operating clearance. Total opening tells you what could theoretically fit. Usable interior accounts for hinges, trim, pipes, baseboards, shelf pegs, and uneven walls. Operating clearance is the space needed to pull a bin, open a door, lift a lid, or stand safely while using the system. Most frustrating storage purchases fail on the third measurement.
Also measure the category. Count how many items must be stored during a normal week and how many appear during peak season. A pantry may need room for holiday baking once a year, but it should not sacrifice daily breakfast access all year for that rare peak. A label system may need blank labels for new categories, but it should not print labels for imaginary future hobbies. Design for normal use, then create one small overflow rule for peaks.
What Not to Store Here
Every successful zone has a not-here list. Do not store sentimental undecided items in active storage. Do not store donation piles in a pantry, towel zone, entryway, or label station. Do not let returns, repairs, and gifts occupy the same container as daily supplies. Those categories need their own temporary homes and deadlines.
If the system keeps attracting unrelated items, the room may be missing a landing zone. Add one small tray or basket for temporary objects, but give it a reset trigger. Temporary storage without a deadline becomes permanent clutter with a nicer container.
For a smaller kitchen category that uses the same pull-forward logic, see our guide to best cereal and grain containers.
A final buying note: do not treat the organizer as permission to increase inventory. The system should make the correct amount easier to maintain, not hide excess. If your home repeatedly outgrows the assigned space, review purchasing habits, laundry timing, grocery cadence, or return routines before adding another storage product. That review is less exciting than a new bin, but it is usually what keeps the system working after the first month.
For households with children, roommates, or guests, use plain language and visible categories. The system should not require someone to remember a private taxonomy. If a guest can understand where an item belongs in ten seconds, the label and location are probably clear enough for daily life.
Evidence Notes and Sources
The pantry recommendations here are supported by food-waste and food-safety sources rather than generic organizing advice. The U.S. Environmental Protection Agency recommends preventing wasted food through planning, storage, and using food before it spoils, which directly supports visible zones, use-first baskets, and shopping from existing inventory: https://www.epa.gov/recycle/preventing-wasted-food-home. USDA and FoodSafety.gov’s FoodKeeper resource explains that storage conditions and timing affect quality and safety, which is why deep pantries benefit from date labels, older-items-forward rotation, and original package information for decanted foods: https://www.foodsafety.gov/keep-food-safe/foodkeeper-app. The FDA’s food-labeling resources reinforce the need to preserve identity and handling information when food leaves its original package: https://www.fda.gov/food/food-labeling-nutrition.
The organizing claim is specific: a deep pantry works when it turns hidden depth into retrievable inventory. Bins, risers, labels, and shelf maps are not valuable by themselves; they are valuable when they reduce duplicate buying, stale food, and unloading a whole shelf to reach dinner ingredients.
Deep Pantry Failure Modes to Watch
The first failure mode is the mystery back row. If reserve food can be seen only after removing several front items, the back row becomes forgotten inventory. Use full-depth pull-forward bins, a written shelf map, or a narrow backstock lane with older duplicates moved forward on grocery day.
The second failure mode is over-decanting. Matching containers can remove cooking directions, allergen notes, lot codes, and expiration dates. Decant only high-turnover staples and keep the original label information or a dated clip-on tag with the container.
The third failure mode is mixed snack dumping. One large snack bin looks easy, but it hides crushed packages, stale items, and unpopular flavors. Split snacks by use case, such as lunchbox, breakfast bars, salty snacks, and use-first open packages.
Seven-Day Deep Pantry Test
Run the pantry for one normal grocery cycle before buying more containers. Put a use-first basket at eye or waist level, load new duplicates behind older ones, and pull each bin forward during meal planning. Track whether anyone buys a duplicate, loses an open package, or leaves food on the counter because the assigned bin is too hard to reach.
At the end of the week, adjust the map before adjusting the product list. If a category overflows, first reduce duplicates or move backup stock; buy a larger bin only when the category is genuinely stable and frequently used.
FAQ
How do I know if this pantry system is working?
Track the reset, not the photo. If the area can be returned to order in under five minutes by the person who uses it most, the system is probably working. If reset requires moving several unrelated objects, the storage is too complicated or too full.
Should every container be labeled for Organize a Deep Pantry Without Losing Food in the Back?
Label shared, seasonal, or visually similar categories. Skip labels for obvious single-use containers. Too many labels can become visual noise, but no labels can make a shared system depend on one person’s memory.
What is the most common mistake for Organize a Deep Pantry Without Losing Food in the Back?
Buying the organizer before measuring the space and defining the category. Measure width, depth, height, door swing, shelf clearance, and the largest item that must fit. Then decide what the organizer is not allowed to hold.
When should I avoid buying anything for Organize a Deep Pantry Without Losing Food in the Back?
Avoid buying when the category is too large, stale, or emotionally undecided. Edit first, group like items, and test with a temporary box or basket for a week. If the temporary setup works, buy the durable version.