How to Build a Home Returns Station That Stops Package Clutter
ProtocolA home returns station works when it turns scattered packages into one visible, deadline-driven queue. The best setup combines a return bin, a small paperwork clip, packing supplies, and a weekly drop-off routine. It should live near your exit path, not on a counter where every package becomes visual noise.
Why Returns Create a Different Kind of Clutter
Online returns are awkward because they are not ordinary storage. A sweater waiting for a return label is not clean laundry. A boxed appliance part is not pantry inventory. A pair of shoes waiting for a carrier scan is not entryway storage. Each item represents an unresolved decision, a deadline, and sometimes money you will not recover until the package leaves the house.
That combination is why returns spread so easily. They start on the dining table because you need room to tape the box. Then the label lives in email, the packing slip stays in the box, the receipt moves to a drawer, and the package waits by the door. By the time you remember it, no single place contains the whole task.
The goal of a home returns station is not to make packages invisible. It is to make the next action obvious. Behavioral-science research on habits supports using stable cues and repeated contexts; the station becomes a cue that says, “This item leaves on the next errand loop.” Visual-attention research also supports reducing unrelated signals on high-use surfaces. A return pile on the kitchen counter competes with cooking, homework, and mail. A contained return queue creates a boundary.
The Four-Part Returns Station
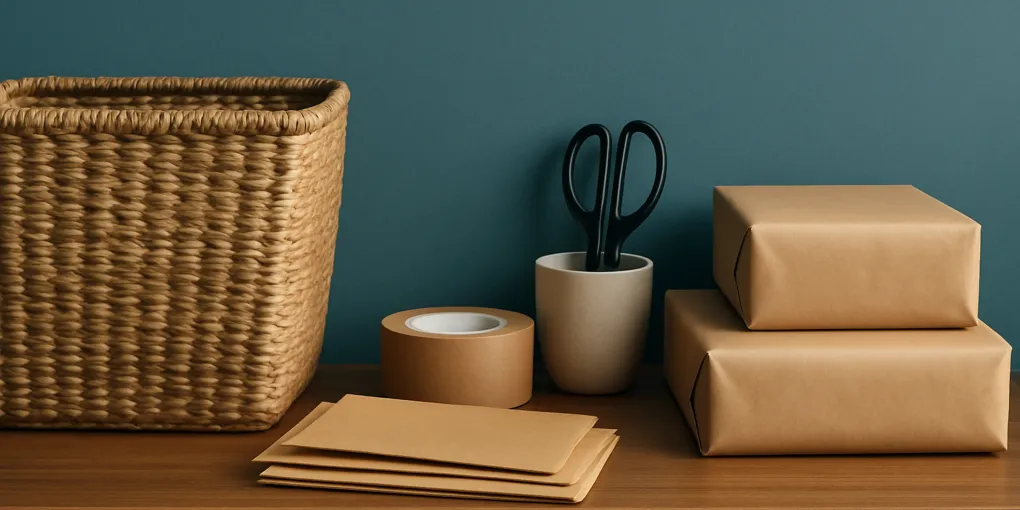
A working station needs four zones: pending items, paperwork, packing supplies, and outgoing-ready packages. You can build all four with simple products: a sturdy bin, a vertical file, a small supply caddy, and a label or deadline card.
The pending-item zone holds anything that still needs a decision or label. The paperwork zone holds printed receipts, packing slips, and handwritten notes. The supply zone holds tape, scissors, spare mailers, and a marker. The outgoing-ready zone holds sealed packages that are ready for the next carrier drop-off.
Do not combine all four zones in one deep basket. A single basket looks tidy for one day, then becomes a dig pile. The station should show status at a glance. If you can tell whether a package is “needs label,” “needs box,” or “ready to go” without opening every parcel, the station is doing its job.
Useful fallback searches include stackable paper trays, small entryway storage basket, packing tape dispenser, and shipping label holder. These are search links because direct ASINs were not independently verified during drafting.
Step 1: Choose the Right Location
Put the returns station near the door you use for errands, package drop-offs, or car trips. An entryway shelf, mudroom bench, garage landing zone, or hall closet shelf can work. A bedroom corner usually fails because it is too far from the exit. A kitchen counter usually fails because it steals space from food prep and attracts unrelated mail.
The station should be easy to see but not in the walking path. If packages sit on the floor, they become trip hazards and collect shoes, backpacks, and grocery bags. Use a shelf, bench cubby, or low bin that keeps packages contained. If you return items by walking to a nearby pickup point, choose a tote with handles. If you usually drive, choose a bin that can move from shelf to car without repacking.
Measure the space before buying anything. Most return piles are not made of huge boxes. They are a mix of soft mailers, small cartons, labels, and one annoying oversized item. A medium bin plus a flat tray often works better than a giant hamper. Oversized boxes can sit beside the station only after they are sealed and ready to leave.
Step 2: Separate “Decision” From “Return”
Many return stations fail because they hold items that have not actually been selected for return. If a jacket is still a maybe, it does not belong in the return queue. It belongs in a decision bin with a date. The return station is for items with a clear next action.
Use three labels:
- Decide by Friday.
- Label needed.
- Ready to go.
This status split matters. A “decide by Friday” item needs a try-on, measurement, or conversation. A “label needed” item needs email, printer, QR code, or account lookup. A “ready to go” item needs transportation. When these statuses mix, the easiest task gets blocked by the hardest one.
If your household has multiple shoppers, add a small card or sticky note with the owner’s name and deadline. Do not rely on memory. A return without a deadline is just clutter with a purchase history.
Step 3: Build the Paperwork Clip
Returns are paperwork-heavy even when the store says the process is paperless. Some returns need a QR code. Some need a printed label. Some need the original packing slip. Some need a note inside the box. The paperwork clip prevents the most common failure: a sealed package with the wrong document inside.
Use one vertical file, clipboard, magnetic clip, or small envelope labeled “returns.” Keep only active return documents there. If you print labels, put the label with the item immediately. If you use QR codes, write the store and deadline on a card and clip it in the file. If the item needs a receipt, put the receipt in the folder before the item enters the return bin.
For digital-only households, the folder still helps. Use it for a handwritten index: store, item, order number, deadline, carrier, and status. The goal is not paper for its own sake. The goal is to avoid reopening five apps while standing near a half-taped box.
Step 4: Keep Packing Supplies Small and Specific
A returns station does not need to become a shipping department. Keep the supply kit small: tape, scissors, marker, a few mailers, a ruler or measuring tape, and maybe clear packing sleeves if you use printed labels. If you keep every possible box size there, the station will become a box graveyard.
Store flattened mailers and envelopes vertically. Keep boxes elsewhere unless they are actively needed. A small supply caddy or drawer insert is enough. The supply zone should be easy to reset in one minute. If it takes five minutes to untangle tape, find scissors, and clear the work surface, you will postpone the task.
Do not store blades, heavy tape guns, or loose scissors where small children can access them. If the station is in a family entryway, put sharp tools in a closed drawer or high shelf.
Step 5: Use a Weekly Return Loop
The station is only half the system. It also needs a routine. Choose one weekly return loop: Saturday errands, Wednesday school pickup, Friday lunch break, or any recurring trip that passes the carrier or store. Write that day on the station label.
A weekly loop reduces decision fatigue because you stop asking, “Should I take this today?” The default becomes, “Returns leave on Friday.” If an item has a shorter deadline, put a visible urgent card on it. Otherwise, avoid one-off trips that make the whole system feel heavier than it is.
At the end of each loop, reset the station. Remove proof-of-drop-off slips, update the paperwork card, throw away unusable packaging, and return tape and scissors to the caddy. The station should be ready for the next return before a new package arrives.
Product Fit and Scoring
ClutterScience evaluates return-station products on capacity and dimensions, material quality, ease of assembly and use, and long-term value. The best products are boring: they make deadlines visible, prevent paper from separating from packages, and survive repeated handling.
| Product type | Capacity & dimensions | Material quality | Ease of use | Long-term value | Composite score |
|---|---|---|---|---|---|
| Open handled bin | 8 | 8 | 9 | 9 | 8.5/10 |
| Vertical file or clipboard | 6 | 7 | 9 | 8 | 7.5/10 |
| Small packing caddy | 7 | 7 | 8 | 8 | 7.5/10 |
| Stackable paper tray | 7 | 7 | 8 | 7 | 7.3/10 |
| Decorative lidded box | 6 | 7 | 5 | 5 | 5.8/10 |
The open handled bin wins because it is visible, movable, and easy to empty. A decorative lidded box scores lower because it hides deadlines and encourages “out of sight, out of mind” storage. Lids are useful only if the station is in a visually prominent room and you already have a strong return routine.
Common Mistakes
The first mistake is making the station too pretty. A beautiful closed basket can hide three expired returns. Visibility matters because return value declines with time. Use a calm-looking bin, but do not hide the status.
The second mistake is saving every shipping box. Keep only a small number of useful mailers and one or two reusable cartons. Break down the rest. A return station should not become packaging storage.
The third mistake is mixing incoming packages with outgoing returns. Incoming packages need opening, inspection, and decision. Outgoing returns need sealing and departure. Keep those workflows apart, even if they live near each other.
Maintenance Plan
Once a week, empty the station completely. Anything ready to go leaves. Anything undecided gets a date. Anything missing a label gets processed or moved to a task list. Wipe the shelf, restock tape, and remove extra packaging.
Once a month, audit the station for category drift. If school forms, reusable bags, or random chargers have moved in, the station has become too general. Return it to one purpose: active returns only.
How We Score This Setup
ClutterScience uses a 30/25/20/15/10 composite score for organization systems: research fit 30%, evidence quality 25%, functional value 20%, user signals 15%, and transparency 10%. For a returns station, the highest-weighted factors are reducing decision friction, keeping deadlines visible, and making outgoing packages easy to remove.
Frequently Asked Questions
What should be in a home returns station?
A home returns station should include a pending-return bin, a paperwork clip or folder, packing tape, scissors, marker, spare mailers, and a visible deadline card. Keep it small; too many supplies make the station harder to maintain.
Should returns be hidden in a closet?
Use a closet only if you already have a reliable weekly return routine. If you often miss deadlines, keep the station visible near the exit path so it functions as a cue.
How do I organize returns without a printer?
Use the paperwork clip for handwritten status cards: store, item, order number, QR-code location, deadline, and carrier. The card prevents digital-only returns from becoming mystery packages.
Bottom Line
A home returns station is a small workflow, not just a storage bin. Put it near your exit path, split items by status, keep paperwork attached to packages, and assign a weekly return loop. The system works when every package has one visible next action and a deadline.
Frequently Asked Questions
- A home returns station needs one bin for pending returns, one folder or clip for receipts and QR codes, packing tape, scissors, mailers, labels, and a visible deadline card.
- Put returns near the exit you use for errands, not on a kitchen counter. The station should be visible enough to trigger action but contained enough that packages do not spread.
- Assign a weekly return trip, write the deadline on each item, and keep only active returns in the station. Anything undecided belongs in a separate decision bin.