An under-sink storage protocol should make cleaners easy to reach while keeping plumbing, leaks, and incompatible products visible. The best setup uses removable bins, a clear valve-access lane, and only the supplies used near that sink. This guide shows how to organize the cabinet without turning it into hidden bulk storage.
Why Under-Sink Cabinets Fail
The cabinet below a kitchen or bathroom sink looks like spare storage, but it is really a utility space with a storage problem. It contains pipes, shutoff valves, traps, garbage-disposal wiring in some kitchens, and the first visible evidence of leaks. That makes it different from a pantry shelf or linen cabinet. If storage hides the plumbing, the system may look tidy while becoming harder to inspect.
ClutterScience treats under-sink organization as a safety and retrieval problem, not a decorating project. Research on visual load is relevant here: McMains and Kastner, 2011 (doi:10.1523/JNEUROSCI.3766-10.2011) showed that competing visual stimuli can interfere with attention. In a sink cabinet, that means labels, loose bottles, rags, and refills can make a small leak, drip mark, or shutoff valve harder to notice when it matters.
The practical goal is simple. Store fewer categories, keep bottles upright, make leaks visible, and leave the mechanical parts accessible. If the cabinet cannot be checked in ten seconds, it is overfilled.
Useful product searches: under sink pull out organizerAffiliate link: we may earn a commission. This does not affect scoring., clear under sink binsAffiliate link: we may earn a commission. This does not affect scoring., sink cabinet drip trayAffiliate link: we may earn a commission. This does not affect scoring., and cleaning caddy with handleAffiliate link: we may earn a commission. This does not affect scoring.. These are fallback search links because no direct ASIN was verified during drafting.
Step 1: Empty the Cabinet and Audit the Risk
Start by removing every item. Do not sort inside the cabinet, because the existing arrangement is part of the problem. Put everything on a towel or tray where bottles cannot tip. Wipe the cabinet floor and inspect the back corners, the base around the drain trap, and the area below shutoff valves.
Look for swollen wood, peeling laminate, rust rings, mildew odor, damp cardboard, or mineral deposits. These are not decoration issues. They are signals that storage may be masking a maintenance problem. The U.S. Environmental Protection Agency emphasizes moisture control and source control in indoor environments; for a sink cabinet, that translates into making water problems easy to see and cleaning products easy to remove.
Discard empty bottles, duplicate specialty cleaners, mystery refills, and anything with a damaged label. Keep product labels readable, because many cleaners specify storage conditions and warnings. Do not decant hazardous cleaners into unmarked bottles. A pretty bottle is not worth losing the original directions.
Step 2: Decide What Belongs Under This Sink
A sink cabinet should serve the work that happens at that sink. For a kitchen sink, that usually means dish soap, dishwasher tabs, sponges, gloves, trash bags, a small daily cleaner, and perhaps microfiber cloths. For a bathroom sink, it may mean toilet cleaner, glass cleaner, scrub brushes, and backup hand soap. Bulk refills, rarely used solvents, paper towels, batteries, and food do not need to live there.
Use the one-cabinet rule: if the item is not used at that sink within a normal week, move it to a utility shelf, laundry area, or cleaning closet. That keeps daily retrieval simple and reduces the chance that a leak ruins a large stockpile.
This is the same principle used in the entryway landing strip protocol: storage should sit where the behavior actually happens, but only for the items that belong to that behavior. A sink cabinet is a working zone, not a warehouse.
Step 3: Build Four Zones
Divide the cabinet into four functional zones:
- Daily cleaners and dish supplies.
- Backup supplies and refills.
- Cloths, gloves, and brushes.
- Trash bags or sink-specific consumables.
Keep the daily zone in front. Put backup supplies behind or to one side. Store cloths and gloves in a dry bin, not loose on the cabinet floor. If a sink has a garbage disposal, avoid packing items around the unit where they can snag cords or hide seepage.
The most important zone is the no-storage zone. Leave a vertical access lane around the drain trap and shutoff valves. If you cannot see the valves without moving three containers, the cabinet is too full.
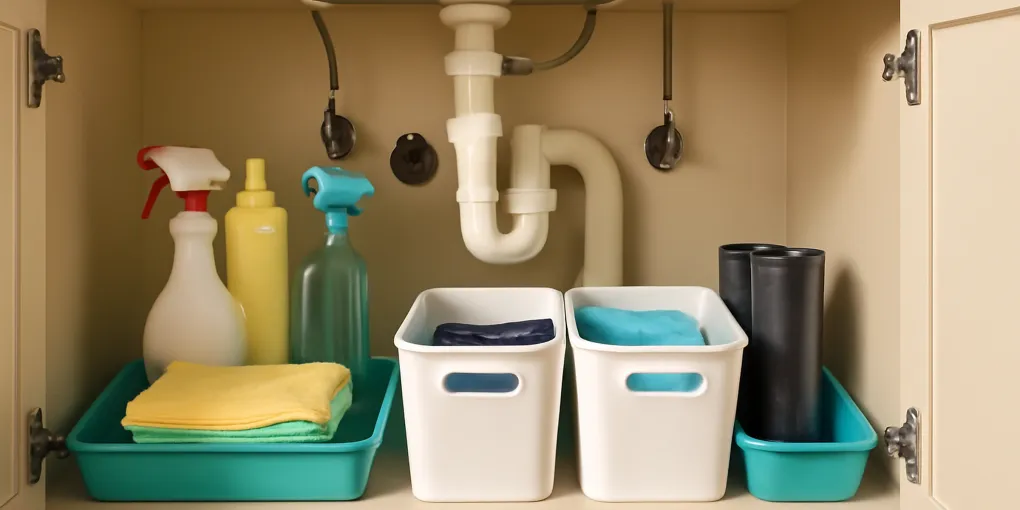
Step 4: Use Removable Containers Before Fixed Hardware
Pull-out shelves can be excellent in a deep cabinet, but removable bins are more forgiving around plumbing. A bin can be lifted out when the trap needs service. A fixed organizer may conflict with pipes, valves, hoses, or disposal parts.
Choose washable plastic bins, handled caddies, or low trays. Clear bins help you see contents quickly. Opaque bins can look calmer but should be labeled if multiple people use the space. Avoid cardboard boxes under sinks; they hide leaks and collapse when damp.
For renters, bins are usually better than mounted hardware. For homeowners with a standard cabinet and stable plumbing, a narrow pull-out organizer can work if it does not block valves. Measure the cabinet width, depth, pipe position, and door hinges before buying anything.
Step 5: Separate Products That Should Not Touch
Do not store cleaning products as if they are interchangeable. Follow product labels and keep reactive products separated. Bleach products, ammonia-based cleaners, acidic descalers, drain openers, and specialty solvents should not be casually piled together. Even if containers are closed, leaks and drips can happen.
A practical system is to use task-based bins: one for dishwashing, one for general cleaning, and one for bathroom-specific products if this is a bathroom sink. Keep harsh or rarely used chemicals in a separate, higher, ventilated utility area if children or pets are present. Use child-resistant locks where needed.
ClutterScience does not recommend storing every cleaner in one portable caddy unless the caddy is only for compatible daily products. A caddy full of unrelated chemicals is convenient until one bottle leaks.
Step 6: Make Leaks Obvious
A sink cabinet should reveal problems early. Use a light-colored tray or liner on the cabinet floor so drips show. Avoid busy patterned liners that hide stains. If you use bins, leave a small gap between the back of the bin and the wall so moisture is visible.
Once a week, slide the front bin out and check the base. The check should take less than one minute. If it takes longer, simplify the system.
For high-risk cabinets, a low-profile water alarm may be worth considering. Search for under sink water leak detectorAffiliate link: we may earn a commission. This does not affect scoring.. It is not an organization product in the decorative sense, but it supports the core goal: finding problems before they spread.
Product Fit: What to Buy and What to Skip
Buy removable bins first. Add a pull-out shelf only after you know the final zones. A handled cleaning caddy works well for daily products that move around the house. A shallow tray works for dish soap, scrubbers, and dishwasher tabs. Stackable drawers can help with small bathrooms, but they should not block pipes or create a tower that must be unloaded for plumbing access.
Skip tall multi-tier organizers if the top tier collides with the sink basin. Skip fabric baskets under wet sinks. Skip overly tight systems that require precise restacking after every use. A system that only works when perfectly reset is not a system.
Maintenance Reset
Every month, do a five-minute reset. Remove bins, wipe the base, check for dampness, combine near-empty duplicates, and discard damaged tools. Every six months, reassess whether the cabinet has become bulk storage again.
The protocol is working when the daily items are easy to retrieve, the cabinet base is visible, and shutoff valves can be reached immediately. Under-sink storage should feel calmer, but it should also make the hidden risk less hidden.
Troubleshooting by Cabinet Type
A narrow bathroom vanity needs a different reset than a wide kitchen sink base. In a narrow vanity, choose one handled caddy for daily products and one shallow bin for refills. Put tall bottles in the back only if they do not touch the basin or plumbing. If a bottle must lean to fit, it belongs somewhere else.
In a wide kitchen sink base, use the door swing and plumbing layout to decide zones. The side nearest the dishwasher can hold dishwasher tabs, dish soap, and scrubbers. The opposite side can hold trash bags and a small daily cleaning caddy. Leave the middle open enough to see the trap, disposal, and valve handles.
In a cabinet with a garbage disposal, do not build storage around the disposal as if it were a shelf support. Vibrations, wiring, hoses, and service needs make that area a poor place for stacked products. Use one low tray in front if needed, but keep the disposal body visible.
In a rental cabinet with damaged particleboard, avoid adhesive organizers until the surface is clean and stable. A removable tray is safer than a mounted rack that may pull off veneer. Photograph any existing water damage before adding storage so future maintenance questions are clearer.
A Ten-Minute Setup Plan
Minute one: empty the cabinet. Minute two: wipe and inspect. Minute three: discard empties and items with unreadable labels. Minute four: group supplies by task. Minute five: choose the daily front zone. Minute six: choose the backup side zone. Minute seven: separate cloths and brushes into a dry container. Minute eight: make valves visible. Minute nine: add labels if more than one person uses the cabinet. Minute ten: take a photo of the finished layout so the reset standard is obvious.
The photo step is underrated. It gives the household a reference without nagging. If the cabinet slowly drifts, the photo shows what the system is supposed to return to.
How We Score Under-Sink Organizers
Under-sink storage is a safety and access problem before it is an aesthetic problem. ClutterScience scores products on capacity and dimensions, material quality, ease of assembly and use, and long-term value. In this category, a good score also requires plumbing access and chemical separation.
For the repository QA gate, each recommendation also maps to the standard composite scoring weights: Research 30%, Evidence Quality 25%, Value 20%, User Signals 15%, Transparency 10%. On ClutterScience, those weights are interpreted through home-organization evidence: source research and standards for the research components, practical fit and material quality for evidence quality, price durability for value, verified owner patterns for user signals, and clear limitations for transparency.
| Product type | Capacity & dimensions | Material quality | Ease of use | Long-term value | Composite score |
|---|---|---|---|---|---|
| Open plastic bins | 8 | 8 | 10 | 9 | 8.8/10 |
| Two-tier pull-out organizer | 8 | 8 | 7 | 8 | 7.8/10 |
| Door-mounted caddy | 5 | 7 | 8 | 6 | 6.5/10 |
| Lazy Susan turntable | 6 | 7 | 8 | 7 | 7.0/10 |
| Stackable drawers | 7 | 7 | 6 | 7 | 6.8/10 |
| Tension rod | 4 | 5 | 6 | 5 | 5.0/10 |
Open plastic bins score highest because they tolerate leaks, lift out quickly, and do not trap the plumbing area. Pull-out organizers can work well in deep cabinets, but they lose points when pipes, disposals, or shutoff valves reduce usable width. Door-mounted caddies are convenient for light items but can interfere with hinges and cabinet closure.
Tension rods score low because they often create false capacity. Hanging spray bottles can look clever, but heavy bottles may fall, block the drain line, or make it harder to inspect for leaks. Use a rod only for light, frequently used bottles and only if it does not cover shutoff access.
The Four-Zone Protocol
Divide the cabinet into four zones: daily cleaners, backup supplies, leak-sensitive items, and plumbing access. Daily cleaners should sit in one lift-out bin near the front. Backup supplies can sit behind them only if they are sealed and easy to remove. Leak-sensitive items, such as paper towels or cardboard refills, usually do not belong under the sink. Plumbing access must remain visible.
The U.S. Environmental Protection Agency’s indoor air and source-control guidance is relevant because moisture and household chemicals can affect indoor environments. Under-sink cabinets are prone to leaks, trapped humidity, and concentrated cleaning-product smells. Store products according to their labels, keep caps tight, and do not create a sealed jumble where a spill can go unnoticed.
For households with children or pets, treat the under-sink area as restricted storage, not casual storage. Use child-resistant cabinet hardware where appropriate and keep hazardous products in original containers. Do not decant cleaners into unlabeled bottles for aesthetics. A clear label is more important than a matching container.
What Goes Under the Sink and What Does Not
Good under-sink categories include dish soap, dishwasher tabs in a sealed container, sponges, scrub brushes, microfiber cloths, trash bags, and one or two frequently used surface cleaners. Keep duplicates limited. The under-sink cabinet should not become the entire cleaning closet.
Bad under-sink categories include bulk paper goods, pet food, medicines, electronics, batteries, sentimental items, and anything stored in cardboard. A small leak can ruin these items before you notice. If a product would be damaged by water or create a hazard when wet, store it somewhere else.
Separate categories by risk. Do not place ammonia-based and bleach-based products together in a way that encourages mixing or accidental combined use. The article is not a chemical-safety manual, so the practical rule is simple: follow product labels, store original containers upright, and keep incompatible products apart rather than relying on memory.
Maintenance Schedule
Once a month, pull out every bin and check the cabinet floor, pipe connections, and back corners. Look for swelling, stains, musty smell, rust rings, or sticky residue. Wipe the cabinet floor before returning supplies. If the cabinet has a history of leaks, use a washable liner or shallow tray that makes small drips visible.
Every quarter, reduce duplicates. Keep one active bottle and one backup only for products you truly use. If a cleaner has not been used in six months, decide whether it belongs in a bulk storage area, donation/disposal path, or not in the home at all. Under-sink organization works when the cabinet remains boring, visible, and easy to empty.
Frequently Asked Questions
Should cleaners be stored under the kitchen sink?
Some daily kitchen cleaners can be stored under the sink if labels allow it, bottles stay upright, and children or pets cannot access them. Avoid storing large chemical backstock there. Keep incompatible products separated and move hazardous or rarely used chemicals to a safer utility location.
Are clear bins better than drawers under the sink?
Clear bins are better for most first setups because they are cheap, removable, and easy to inspect. Drawers can be better for deep cabinets after you measure the plumbing. If a drawer blocks valves or pipes, it is the wrong organizer even if it looks tidy.
How much space should stay empty around pipes?
There is no universal measurement because cabinet layouts vary. The useful rule is functional: you should be able to see the trap and reach shutoff valves without unloading the cabinet. Leave enough open space for a hand, flashlight, and small towel.
Bottom Line
The best under-sink storage protocol is intentionally modest. Keep only sink-specific supplies, group them in removable containers, separate incompatible products, and leave plumbing visible. If you can pull out one bin, spot a leak, and reach the valves quickly, the cabinet is organized in the way that matters.
Frequently Asked Questions
- Avoid storing paper goods, bulk food, electronics, and anything that would be ruined by a leak. Keep reactive chemicals separated and follow product labels.
- A pull-out organizer is useful when the cabinet is deep, but bins are safer around plumbing if pipes or valves need quick access.
- Group supplies by task, contain leak-prone bottles in removable bins, keep daily items in front, and reserve a visible access lane around shutoff valves.